I wonder how people travel long distances with the tripod that is attached to the backpack. Attaching the tripod to the backpack is so easy. There are multiple ways to attach your tripod to the backpack. I did some experiments with my backpack. So How to attach a tripod to a backpack?
You can attach your tripod to the backpack in multiple ways. A backpack has several straps like Compartment, compression, side, bottom, stabilizer, and sternum straps. All these straps are used to attach any equipment to the backpack. While some positions suit some situations while others may hurt your back.
Mounting the tripod is easy but the placement is essential. Some people attach their tripod to the side pockets of the bag and some attach it to the bottom side of the bag. If you have a tripod cover to carry it, you can get rid of dust and water too. Let’s know in detail.
How to Attach a tripod to your Backpack
There are several ways to attach your tripod to the backpack but the destination matters. If you are traveling to far distances, you need a special backpack that can hold tripods steadily. If you are just taking the tripod to near destinations, a normal backpack can also help.
And also, the weight and height of the tripod also matter. If your tripod is too heavy and the luggage in the backpack also heavy, the straps of the bag might damage. If the tripod is too long even after folding, it might get damaged with the other things.
A travel backpack contains Compression straps, side pockets, stabilizer straps, Sternum straps, help belts, and equipment straps. A regular backpack may also have side pockets, compression, and sternum straps. All the latest version backpacks have side pockets and sternum straps.
Now, consider these things to start attaching the tripod to your backpack. A wrong push can damage the tripod and also the straps of the backpack. So you first check the compatibility of the tripod and that has to be folded.
Now check your backpack. If your backpack has any of the straps mentioned above, it is good to tie the tripod for short destinations. If you are a travel blogger/vlogger, read more to know the full details.
1 Mounting it on the center of the backpack
Mounting the tripod from the center of the backpack is a good option but you need to have the straps for it. The regular straps in the backpack we use at the backside of the bag and we cannot attach it there. When we carry the backpack, the backside of the bag touches our back, and the tripod attachment might be the wrong decision.
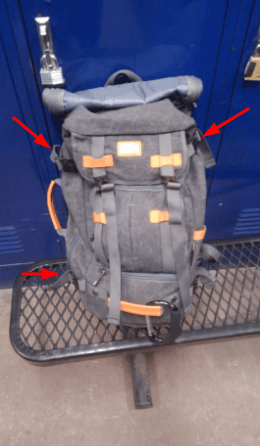
You need to attach the tripod on the front side of the back. You may get confused here but here is the designed image to clarify your doubts. So from the picture, you can see that the front side bag has straps to attach some equipment.

The tripod can be attached to the front side using the front side straps but when comes to downsides, for longer distances, you need to check multiple times. Suppose if you are riding a bike with the bag and tripod on the front side, you have to be cautious.
Compared to other mounting methods, this isn’t strong and recommended. In case, if you need not worry about tight folding and need a temporary attachment, the front side is a good thing.
It also has positive points like irrespective of height, you can attach it here. Sometimes, you can even attach the tripod even without folding it. So, this is a good option to skip regular unfolding intervals. Check this quick video that explains the attachment.
So, from the video, you can see that you need webbings (also called Packing straps) for the bag. You can easily get these straps anywhere. Here is the cheapest one from Amazon, you will get 4 pieces of the straps in a variety of colors. If your bag doesn’t have the straps, you can attach these.
Now coming to the real-life problems, mounting a tripod to the center of the backpack like most people do with their outdoor bags may lead to some issues. As far I experienced, it just bounces against the inside contents like a camera and lens.
Suppose if you have the lens at the topmost compartment inside the bag, the friction between lens and tripod might lead to the damage.
2 Mounting it to the side straps
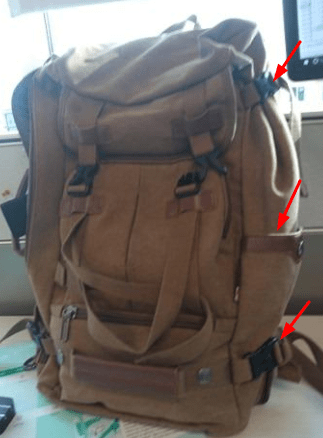
Just like mounting at the center of the backpack, you need to mount this tripod in the sidearms of the backpack. Most of the backpacks have side straps. Obviously, your backpack should also have sidearms that you can use to attach the tripod.
You can see the side straps from this picture. Attach your tripod here and the tripod will be stable enough to carry while traveling. If your backpack doesn’t have the side straps, you can get them from Amazon. Check these very affordable Vtete side straps for the backpack on Amazon. You need to buy a minimum of 6 Release Buckles to secure the tripod.
Check this video to know how to stitch some side straps to the backpack. You can easily get the webbing straps from Amazon and can stitch them to the backpack. Above is the detailed video.
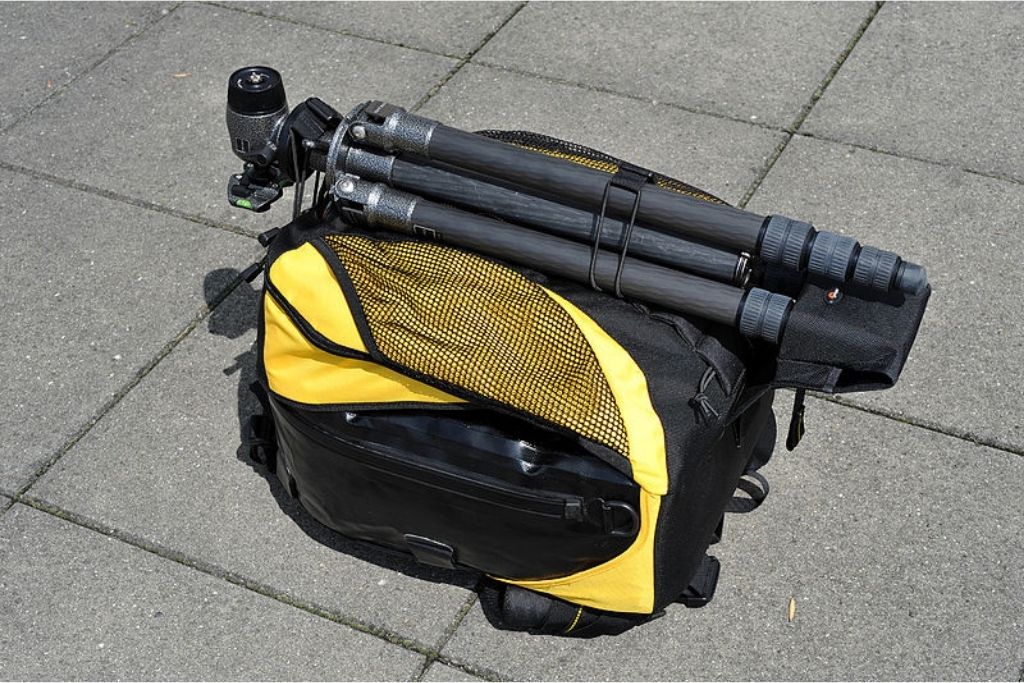
3 Attaching the tripod at the bottom side of the Bag
This is my favorite method to attach my tripod to the backpack while I was traveling. First, it doesn’t slip from the grip, and because often gravity pulling force, there would be no issues while traveling.
Second, my gear including camera, lens, memory cards will be safe from the friction on the tripod. And mostly, you don’t need extra straps to attach the tripod. Most of the backpacks have side and bottom straps.
The weight of the tripod and backpack are uniformly distributed to the gravitation force and you don’t feel the extra weight. But in the case of center hanging, you feel the bag wight and tripod weight differently.
The only downside I feel about this method is to sit on the ground. When you accidentally put your backpack on the ground or when you sit on the ground with your back, the tripod will be affected.
The paint or some joints of the tripod can be damaged because of the force you put on the bag. You must take your bag out from the shoulders before taking your seat otherwise, you’ll be responsible.
It’s still a good option when you are walking but when you are riding the bike with the backpack on your back, you must attach the tripod to the side packs or at the top of the backpack.
4 Getting a new backpack with Multiple straps
You can also attach it to the backside of the backpack but that is the most foolish place to attach. It continuously touches your back. For longer distances, it surely hurt your back for sure. So, I’m not suggesting attaching your tripod to the backside of the backpack.
So the best solution is to get a new travel backpack from Amazon. When One of my friends went o hiking, he took the Canvas backpack from Witzman and he was super happy with the backpack. It has multiple straps on the front side, rear side, side straps with release belts.
When I checked this backpack on Amazon, I found it’s a decent deal for the backpack. The quality of material and leather used is too good. My friend said he loved the color of this backpack. You can check the current price of the backpack by clicking here.
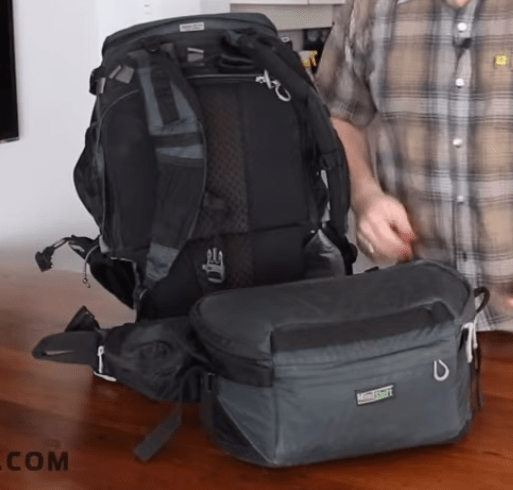
The backpack is 100% Polyester and the outer material is Canvas. You can give it a try. Another premium backpack is with the rotation compartment. This premium backpack from the MindShiftStore brand has some great features.
- This premium backpack has a 180-degree rotational compartment separately. You might feel frustrated when we have to take our personal stuff and camera gear in the same bag. So, this backpack has a compartment separately to keep the camera stuff.
- The capacity of this backpack is 22L. It is a huge storage space for your personal things and the camera tuff as well. When we talk about attaching the tripod to this backpack, it fits perfectly.
- This backpack has multiple straps on the side, top, and bottom sides of the bag. The two parts are separated so the bottom part can rotate so there is no way to combine them into one compartment.
If you can stretch the budget, this Premium backpack from the MindShift is the best option for your camera, tripod, or monopod and your personal stuff as well. So, to get the backpack, click here to check the current price on Amazon.
Conclusion
There are some of the methods to attach your tripod with the backpack. Travel professional photographers might have premium backpacks and the prices would be around $500. As a beginner, you do not need to spend so much, instead, you can use the money to get some lenses.
Getting a backpack isn’t the only solution for everyone. If you have a bag that has side webbing straps and release belts, you can try to fit the tripod in it. Most beginners have light-weight tripods which wouldn’t be the problem.
Always have some extra straps and release belts to stick to the bag. According to the tripod height and weight, choose a wise backpack. The position of the tripod to the backpack is also important. Try to mount the tripod in a convenient direction.
CapturingGuide.com is a participant in the Amazon Services LLC Associates Program, an affiliate advertising program designed to provide a means for sites to earn advertising fees by advertising and linking to Amazon.com. We may earn a commission when you buy through links on our site.